Easy and Simple Steps on How to Braid Your Own Hair
You can easily learn how to braid your own hair with these easy steps. First, separate your hair into three sections at the nape of your neck. The right strand will be the center strand and it will be held in the right hand. Next, the left strand will be the center strand and will be held in the left hand. After this, the right tying the braid with bobby pins.
Here’s some steps, How to braid your own hair
Brush your Hair
The next step is to brush your hair and decide which side you want to braid. Then, divide your hair into two sections and cross the outer strand over the middle one. Then, tie a small rubber band to each section. Once the tying is done, you can move onto the next step. To start tying the braid, use a comb to separate the pieces. Then, twist the two strands together and crimp the ends together.
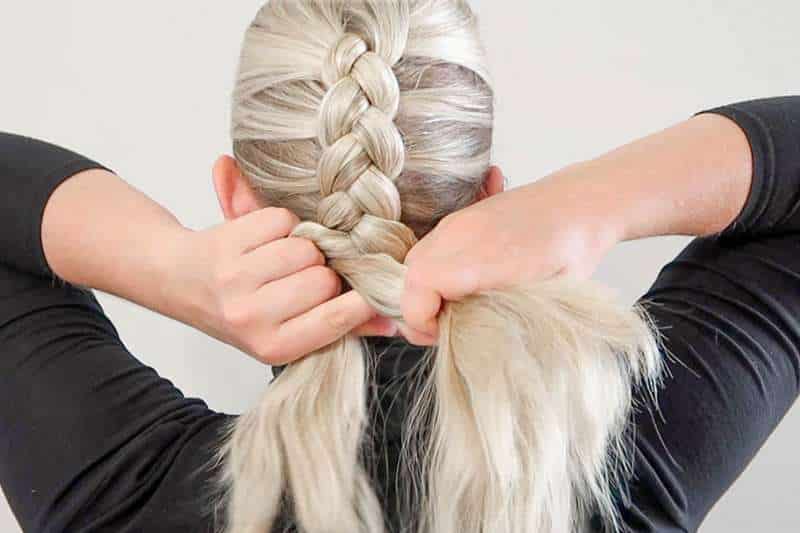
Now, you’re ready to begin braiding your hair! Make sure to divide the hair into sections and keep each piece separated. This step is important because the braid must be neat and avoid tangling. If you’re braiding your hair for the first time, you may want to use a texturizing spray to keep the hair in place. Alternatively, you can hold the opposite side strand with the index finger and thumb.
Divide your hair into sections
To braid your own hair, start by dividing your hair into sections. Take the outer section and then divide the rest into three. Then, cross the middle section over the outer one. Once the two sides are crossed, release the middle section. After tying the braid, tie the remaining strands together and let them remain loose. You can do this step several times and make the braid as long as you are patient enough.
You can also add your side hair by separating it with your thumb. It’s essential to remove the hair clip on the left side of your head so that you can work with your hair. You should always try to make the braids neat and even as possible. So, follow the steps outlined above: once you’ve done the first step, decide on the type of braid you want to wear. Once you’ve chosen the style and the color, you’re ready to put it into your own tresses.
Decide where you want your braid to fall
The next step in learning how to braid your own hair is to decide which side you want to braid. Choose the side you want to braid by using your thumb to hold the middle section. Now, divide the rest of your hair between the two sections with your other hand. It’s important to use both hands to braid your own tresses. You should make your own styles and experiment with colors. So, try out braiding your own hair and enjoy the benefits of braiding your own locks! You will be amazed at the results.
Once you’ve decided on which side you’d like to braid, you need to start by dividing your hair. This will allow you to create your braids with more freedom. Then, you can try a new style with your new tresses. Depending on the length of your tresses, you’ll be able to use different techniques to create the perfect look. You can even practice on your own.
Braiding Cream or Gel
Once you’ve learned how to braid your own hair, it’s time to apply the hairstyle. The first step is to brush your hair. After this, decide which side you want to braid. After that, split your hair into two parts and apply some braiding cream or gel. Afterward, the final step in braiding your own tresses is to secure the braids with a hair tie. You can use any kind of braiding product, such as coconut oil.
Conclusion
Once you have brushed your hair, you can decide on which side you would like to braid. This will help you determine which side you want to braid. After you’ve decided on which side, split the hair into two sections. Using the index finger of the other hand, pull the top part of the braid up and into the free hand. After this, release the middle section of the braid and you’re all set to go!
For more articles please visit www.lifestylebuz.com